![]()
Payments
![]()
![]()
|
Payments |
|
|
The PAYMENTS screen displays all the payments made. The information on the PAYMENTS screen will display differently depending on whether you're set up for online payments or not.
How to make online payments if you are an ACH customer
How to view and use the Payments screen when you are set up for online payments
How to view and use the Payments screen when you are NOT set up for online paymentsHow to use the PAYMENTS screen when you are set up for online payments:
Click on PAYMENTS in the Accounts Payable menu bar. The PAYMENTS screen will display.
The In Process payments are displayed by default. See the example below. You can mouse over Payment Authorizer ID's to see the full name.
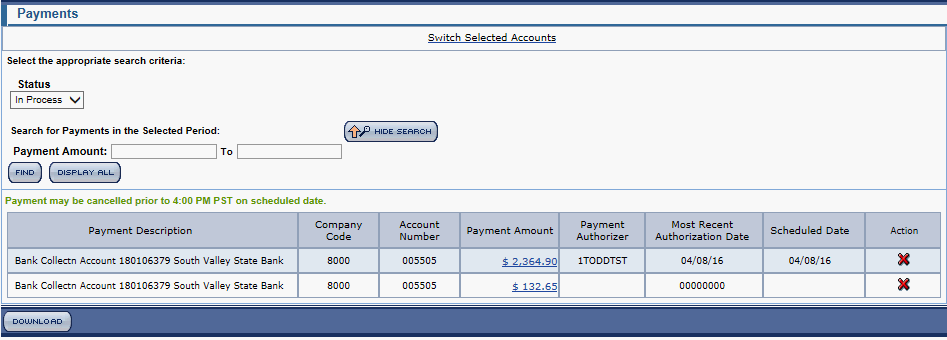
- The information per item includes the Payment Description, Company Code, Account Number, Payment Amount, Payment Authorizer, Most Recent Authorization Date, Scheduled Date and an Action column.
- You can click the Switch Selected Accounts link at the top of the screen to make a new account selection or change your selected accounts. If you access the SWITCH SELECTED ACCOUNTS screen from any screen and make a new account selection, you will automatically be returned to that screen and see it refreshed with the new account selection made.
- When you are displaying records with a status of In Process, you can click the red "X" icon in any row to delete that payment. Note: On the CLOSED TRANSACTIONS > In Process screen, you have to cancel each separate transaction individually. But on the PAYMENTS screen, you can cancel all selected invoices all at one time.
- If you mouse over any code in the Company Code column, a small pop-up window will display the name associated with the code (for example, "McK Drug Company").
- You can click the Download button at the bottom of the Payments screen to either Open or Save the payment data in CSV (comma-separated value) format.
- Click on any blue link in the Payment Amount column.
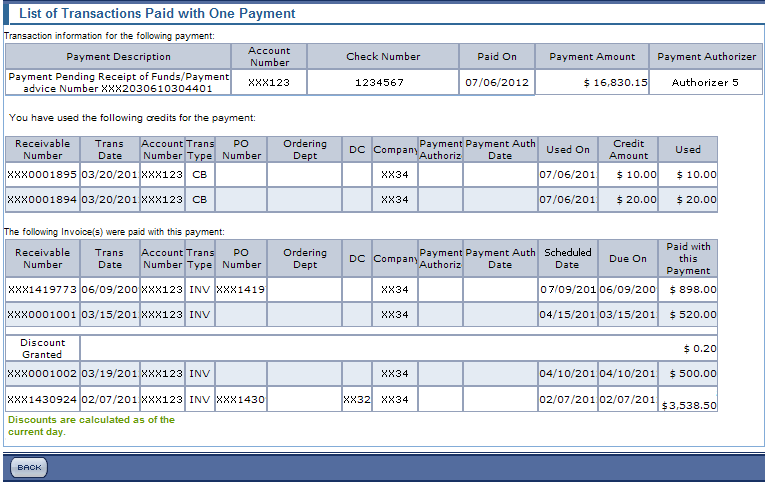
- The LIST OF TRANSACTIONS PAID WITH ONE PAYMENT screen will display with the details regarding which invoice was cleared and with which check number. The screen also displays the credits you have used for the payment, the invoices that were paid with the payment, and any discounts that were granted. You can mouse over Payment Authorizer and Last Approver ID's to see the full names. See an example of the LIST OF TRANSACTIONS PAID WITH ONE PAYMENT screen below.
- Click the Back button at the bottom of the screen to go back to the initial PAYMENTS screen.
- Select Processed in the Status drop-down menu and click the Find button. A new screen displays. See the example below.
- The information per item includes an Account Number, Company Code, Effective Date, Document Number, Check Number, Payment Amount, and Total Check Amount.
- You can search for new data by entering your search criteria for the Check # range, Payment Amount range, Document #, Effective Date range, and Total Check Amount range. Then click the Find button.
Note: If you enter a non-numeric values in the Total Check Amount search fields, the pop-up window below will display to alert you. Special characters such as commas or currency units are not allowed.
- Payments may be canceled prior to 4:00 PM PST on scheduled dates.
- Click on any blue link in the Check No column.
- The CLOSED TRANSACTIONS screen will display, showing all the invoices which were cleared with that check number. See an example below.
- Click on any Receivable Number link to Open or Save the invoice's details in PDF format.
- If you wish, you can select Beyond 3 months instead of 0 - 3 months from the Clearing Date Period drop-down menu. Then click the Find button.
- You can mouse over Payment Authorizer and Last Approver ID's to see the full names.
How to make online payments if you are an "ACH" customer:
To make a payment, select the payment method (i.e. Bank Account) you want to use from the drop-down menu under "2. Select the payment method you want to use. You are paying with...".
Note: The default account, which you can set up in Administration > Account Preferences > Bank Data, will be listed first at the top.
The third step reads "3. Choose Continue to check and confirm your payment." Click the Continue button to proceed with the payment for a selected transaction.
- To pay an invoice, select the invoice and click the Pay icon in the Action column on the far right of the screen. Then click the Continue button at the bottom of the screen..
- The LIST OF TRANSACTIONS SELECTED FOR PAYMENT screen displays as shown below:
- The schedule date will automatically be determined for you, according to the Due Date on the invoice you selected. The schedule date will be set to one day prior to the due date. If the due date is on a holiday or weekend, it will automatically use the next business day.
- ACH customers have the ability to edit the payment date to a future date. Note the Schedule for box in the screen shot below. Type the date manually or use the pop-up calendar to select it.
Note: This feature is not available for non-ACH or ‘payment advice’ customers.
- If any of the invoices are Past Due, the system will use the current date (unless the current date is after 2:00 P.M. PST – then it will default to the next business day). You can use the pop-up calendar to select another date (for days Monday – Friday only, not Saturday or Sunday). If you try to submit a Saturday or Sunday, you’ll get a pop-up message alerting you that it is not a valid day for selection. ACH online customers must initiate/authorize payments in McKesson Connect Accounts Payable by 4:00 PM PST.
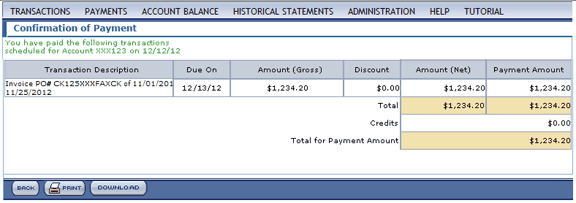
- After your Schedule for date selection is made, click the Submit button at the bottom of the screen. The CONFIRMATION OF PAYMENT screen displays with the payment data. The buttons at the bottom of the screen allow you to Print or Download the data, which will download in CSV (comma separated value) format in Excel. You can also click the Back button to return to the previous screen.
How to use the PAYMENTS screen when you are not set up for online payments:
Click on PAYMENTS in the Accounts Payable menu bar. The PAYMENTS screen displays, showing your Processed invoices. See the example below.
Note: If you are not set up to make online payments, the In-Process screen and Clearing Date Period drop-down menu will not display.

Enter a range of check numbers in the Check # fields.
Tip: Use the 'from / to' boxes to enter any date ranges for which you want search results.- Enter a payment amount range in the Payment Amount fields.
Tip: Use the 'from / to' boxes to enter a payment amount range for which you want search results.
- Type a document number into the Document # field.
- Enter an Effective Date range per the mm/dd/yyyy.
Tip: Use the 'from / to' boxes to enter the effective date range for which you want search results.
- Click the Find button to display your search results.
- After you click the Find button, the search results will display. Account No., Company Code, Effective Date, Document No., Check No., and Payment Amount columns display with the results per your search criteria.
Note: You can sort the data by clicking any column header.
- You can also click the Reset button to start over and enter new search criteria.
- Click the Display All button to display all your transactions.
- Click the Download button at the bottom of the screen to Open or Save the data in Excel format.
|