![]()
Closed Transactions
![]()
|
Closed Transactions |
|
|
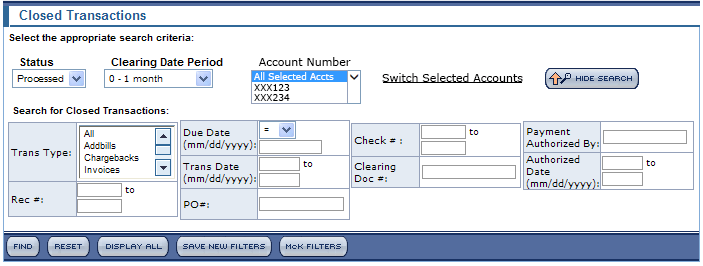
The CLOSED TRANSACTIONS screen allows you to search for and list your closed transactions. The screen will initially display blank, allowing you to enter specific search criteria to narrow down your search results. The search criteria options include Transaction Type, Rec #, Due Date, Transaction Date, PO #, Check #, Clearing Doc #, Payment Authorized By, and Authorized Date. See an example of the initial CLOSED TRANSACTIONS screen below.
How to use the Closed Transactions screen
Use the links below to jump to any of these three topics on this HELP page...
How to use Closed Transactions Search Results
How to use Ordering Receipt icons
How to use the CLOSED TRANSACTIONS screen:
In the McKesson Connect portal's top menu bar, click on Closed Transactions in the ACCOUNTS PAYABLE sub menu (under Business Management / Programs) for direct access to the CLOSED TRANSACTIONS screen.
Note: You can also click on the TRANSACTIONS tab in the Accounts Payable menu bar and select Closed from the sub menu.
The CLOSED TRANSACTIONS screen displays.

Select either Processed or In Process from the Status drop-down menu.
For Processed invoices, you can select 0 - 1 Month, 0 - 3 Months, or Beyond 3 months from the Clearing Date Period drop-down menu.
Note: The In Process screen does not have any options for the Clearing Date Period.- Note the Account Number drop-down menu. In addition to your selected accounts, you can also choose All Selected Accounts. This allows you to select and display multiple accounts. However, you can still filter accounts from within the screen to view only particular accounts.
- You can click the Switch Selected Accounts link at the top of the screen to make a new account selection or change your selected accounts. If you access the SWITCH SELECTED ACCOUNTS screen from any screen and make a new account selection, you will automatically be returned to that screen and see it refreshed with the new account selection made.
- Use the Search for Closed Transactions fields to enter your search criteria. You can click the Hide Search button to hide the Extended Search feature.
- Select an option from the Transaction Type drop-down menu. e.g. All, Addbills, Chargebacks, Invoices, Drop-Ship Invoices, Credit Memos, Pricing Correction, etc.
- Enter a Due Date per the mm/dd/yyyy.
Tip: Use the "=, <, >" drop-down menus to refine your searches.
- Enter a Trans Date per the mm/dd/yyyy.
Tip: Use the 'from / to' boxes to enter any date ranges for which you want search results.
- Enter the Check #.
Tip: Use the 'from / to' boxes to enter any date ranges for which you want search results.
- Enter the information to identify Payment Authorized By.
- Enter the Clearing Doc #.
- Enter the Authorized Date per the mm/dd/yyyy.
Tip: Use the 'from / to' boxes to enter any date ranges for which you want search results.
- Enter the Rec #.
Tip: Use the 'from / to' boxes to enter any date ranges for which you want search results.
- Enter the PO #.
- After you've entered all your search criteria in the Search for Closed Transactions fields, click the Find button to display search results.
Note: Search criteria is not case sensitive and you can use an asterisk <*> for wildcard searches.
- Click the Save New Filters button to save your current entries as the default search criteria for this screen.
Note: All users are pre-configured with the ‘McKesson’ defaults for all screens. You must enter specific search criteria and then click the Save New Filters button to change the pre-configured defaults. However, the Transaction Date, Status, and Clearing Date Period will not be saved when you click the Save New Filters button.
- Click the McK Filters button to restore the search criteria to ‘McKesson’ default values for this screen.
- Click the Display All button to display ALL the transactions data available.
- You can always click the Reset button to enter new search criteria. Then click the Find button again.
The CLOSED TRANSACTIONS search results display. The information includes the Receivable Numbers, Transaction Dates, Account Number, Transaction Type, PO Number, DC, Company Code, Payment Authorizer, Last Approver, Check Number, Due Date, Cleared Date, Gross Amount, Gross Payment, Discount, and Net Payment. See an example below.
On the Closed > Processed screen, sorting is available for all columns except Action. This includes the Last Approver and Cleared Date columns. The data is also available in Summary header downloads in Excel format.
If you mouse over any code in the DC column, a small pop-up window will display with the DC name and code number (for example, "DENVER DC #8131""). If you mouse over any code in the Comp Code column, a small pop-up window will display the name associated with the code (for example, "McK Plasma & Biologics" or "Specialty Distribution").
On the Closed > In Process screen, you can mouse over text in the Payment Authorizer and Last Approver columns to display a small pop-up with the full name of the payment authorizer or last approver. See a sample Closed > In Process screen below. The mouse-over/pop-up feature is also available in the Last Approver column on the Open Transactions and For Approval screens.
How to use CLOSED TRANSACTIONS search results:
Click on any Receivable Number link to Open or Save the invoice's details in PDF format.
You can use the
icon to sort any column except for Action and Payment Amount. Dollar amount fields will be sorted based on absolute value.
Click any link in the Payment (Gross) column to review those details. A PAYMENTS screen will display. The transactions details and Check Number used to close the transaction are displayed. See the example below.
You can click on the link in the Payment Amount column under "The invoice was paid with the following payments". The LIST OF TRANSACTIONS PAID WITH ONE PAYMENT screen will display with additional details. See the example below.
When you finish reviewing the LIST OF TRANSACTIONS PAID WITH ONE PAYMENT screen, click the Back button to return to the CLOSED TRANSACTIONS search results screen.Back on the CLOSED TRANSACTIONS search results screen, hover over the
icon in the Payment Information column. The pop-up below will display. If you click on the icon, you can review information regarding other payments and settlements related to the transaction.
Hover over the 'folder' icon in the Action column. The pop-up below will display. If you click on the icon, you can save PDF or ZIP compressed file versions of the transaction data to your local computer.
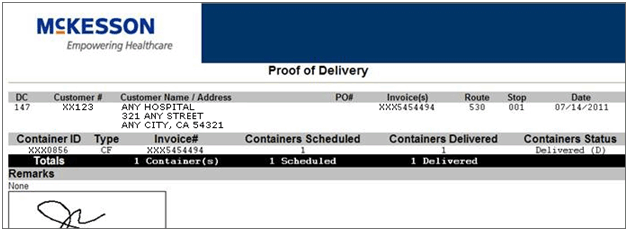
If a POD (proof of delivery) is available, a pencil icon will display in the Action column. When you click on the pencil icon in the Action column, the POD will display. If a POD is not available for a transaction, the pencil icon will not be displayed. The POD screen has a Download button. You have the option to open or save the POD in PDF format.

You can select any transaction listed on the CLOSED TRANSACTIONS screen (with its check box on the far left) and click the Print button at the bottom of the screen to print the transaction data.
If you click the Select All check box
in the top left corner next to the Receivable Number column, it will select ALL the transactions (on every page of the total transactions listed).
- You can download transactions listed by selecting one or more (use the check boxes on the far left of the screen) and then click the Download button. The DOWNLOAD TRANSACTIONS screen will display with the following options for downloading in various formats:
- Summary Invoice Header Level Data
Comma-separated format, for use in MS ExcelTM or other programs, one row per invoice. Limit of 1,000 transactions.
- Detailed Invoice Line Level Data – Consolidated
Comma-Separated format; for use in MS-Excel or other programs; one file and one row per invoice line within the file. Limit of 200 transactions.
- Detailed Invoice Line Level Data - Non-Consolidated
Comma-Separated format; for use in MS-Excel or other programs; one file per invoice and one row per invoice line within the file (zipped). Limit of 200 transactions.
- PDF - Portable Data Format
PDF for Adobe Reader or image file format; PDF's/images of invoices; one PDF or image per invoice (zipped). Limit of 200 transactions.
- XML - Extended Markup Language
XML format used for import into some AP systems; one file and one section per invoice within file. Limit of 200 transactions.
Select any of the options above by clicking its button on the far left and then click the Download button at the bottom of the screen. A pop-up window will display, allowing you to either Open or Save the invoice to a location on your local hard drive.
If you select Summary Invoice Header Level Data and exceed the 1,000 transactions limit, the pop-up warning message below will display. Click the Proceed button to download the first 1,000 transactions listed. Click the Cancel button to cancel the download request.
If you select more than 200 invoices or items to download or print, a pop-up message will display which reads: "You have exceeded the download limit of 200 items. Please click on ‘Proceed’ to download the first 200 items or ‘Cancel’ to go back and adjust your selection!" See the screen shot of the pop-up message below.
How to use ORDERING RECEIPT ICONS:
If you are enabled to use the McKesson Connect Ordering application, you have the ability to update the receipt status (at a line item level) for orders you've placed via the Ordering application. If you do utilize this functionality, the receipt information can also be seen via the TRANSACTIONS screens within the Accounts Payable application. See the details below for clarification.
Click on the TRANSACTIONS tab in the Accounts Payable menu bar and select For Approval, Open, or Closed in the sub menu.
At the far right of the screen, you may see one of the three Ordering Receipt icons below. It will be displayed in the Action column for any given line item. These icons represent the status of the order receipt: Finalize, Partial, or No Receiving Information.
By clicking on any of these icons, you can drill down into ORDERING DETAILS screens with information regarding the item level receipt status. See the line item example below. The icon indicates that the order has the Finalize status.
If you click on the icon, an ORDERING DETAILS screen displays and the order shows Finalize in the Received Status column. See the screen shot below. Note the other columns and order details that display on the ORDERING DETAILS screen.