![]()
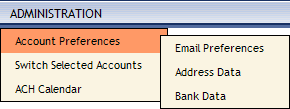
Account Preferences
![]()
![]()
|
Account Preferences |
|
|
This ACCOUNT PREFERENCES option in the ADMINISTRATION sub menu allows you to review your account information or set preferences for your account. There are three tabs to select from in the sub menu that displays under ADMINISTRATION > ACCOUNT PREFERENCES: Email Preferences, Address Data, and Bank Data.
Note: Depending on the status of your account, all account preferences may not be accessible to all users.
Use the links below to jump to any of these three topics on this HELP page...Email Notification Preferences
Address Data
Bank Data
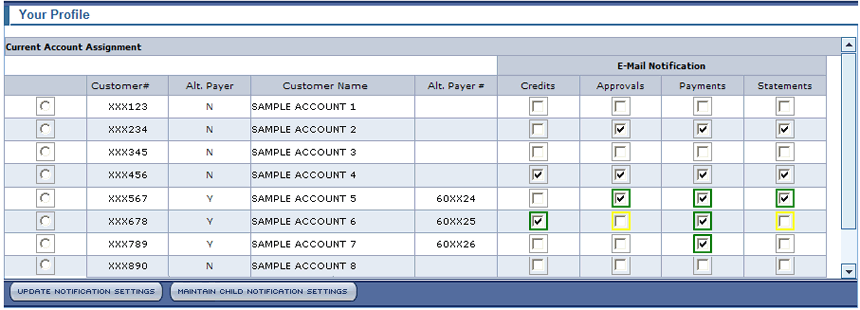
Email Notification PreferencesWhen you click the Email Preferences tab in the ACCOUNT PREFERENCES sub menu, the YOUR PROFILE screen displays. This screen allows you to set up Email Notifications. McKesson Connect Admin can enable this Email Notifications feature for you. See an example of the YOUR PROFILE screen and instructions regarding how to use it below.
The YOUR PROFILE screen lists all of your accounts. A green box (in any item row) indicates that it's a National Reporting Number account and ALL of the associated child accounts also have email notifications turned on. A yellow box indicates it’s a National Reporting Number account and only some of the associated child accounts have email notifications enabled. In both cases, the account's multiple customer numbers (child accounts) will be consolidated in the same email notification.
How to update your Email Notifications:
Click the ADMINISTRATION tab in the Accounts Payable menu bar, hover over the Account Preferences tab, and select Email Preferences from the sub menu that displays.
To update your email notifications, click on the round button next to the Customer # (on the far left of the screen).
Note there are check boxes in each of the following four columns per row.
- Credits: Will send a consolidated email every day of all the credits posted to your account
- Approvals: Will send an email notification regarding every invoice you need to approve
- Payments: Will send a notification for every payment posted to your account
- Statements: Will send a notification when a statement has been generated for your accountSimply click in any box to activate an email notification. To de-select an email notification setting, click its checked box to un-check it.
After you’ve made any changes, click the Update Notification Settings button at the bottom of the screen.
To update child notification settings, click the Update Child Notification Settings button. A new screen displays listing all your child accounts. If you un-check any of the settings, the header box at the top will turn from green to yellow.
Click the Update Notification Settings button to confirm any changes.
Address Data
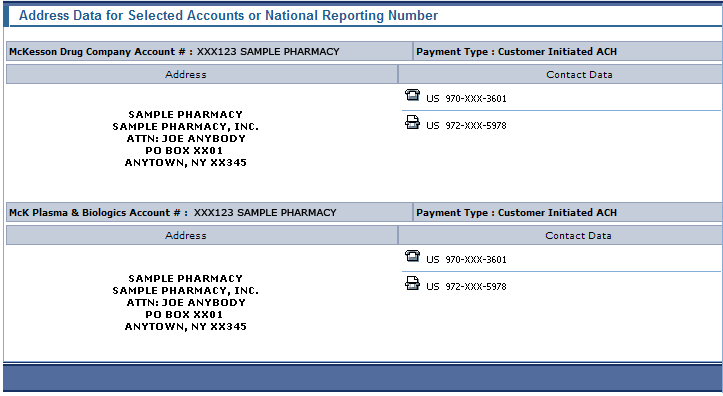
The ADDRESS DATA screen is strictly informational. There are no interactive features on the screen. It simply displays the account information for a National Reporting Number account or selected individual account. See an example of the screen below.
How to access and review the ADDRESS DATA screen:
Click the ADMINISTRATION tab in the Accounts Payable menu bar, hover over the Account Preferences tab, and select Address Data from the sub menu that displays. The ADDRESS DATA FOR SELECTED ACCOUNTS OR NATIONAL REPORTING NUMBER screen displays.
The account's name, number, and address are displayed on the left side of the screen.
The account's payment type, contact data, and telephone numbers are displayed on the right side of the screen.
Bank Data
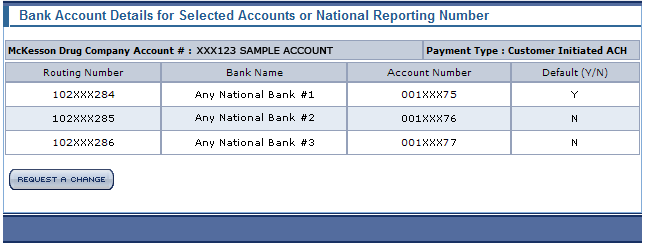
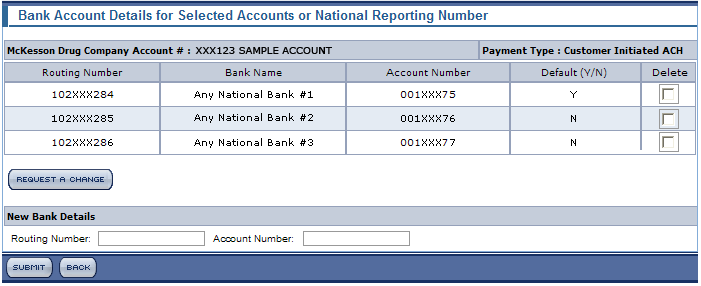
The BANK DATA screen displays bank account details for selected accounts or national reporting numbers. See an example of the screen below. This example shows only one account but the screen may display multiple accounts and account types, depending on the number of accounts you have.
How to access, review, and update the BANK DATA screen:
Click the ADMINISTRATION tab in the Accounts Payable menu bar, hover over the Account Preferences tab, and select Bank Data from the sub menu that displays. The BANK ACCOUNT DETAILS FOR SELECTED ACCOUNTS OR NATIONAL REPORTING NUMBER screen displays. See an example below.
The bank account's routing number, name, and number is displayed.
In the Default column, there will be a ‘Y’ or ‘N’. The ‘Y’ indicates which Routing Number is your default displayed first on the OPEN TRANSACTIONS screen.
Click the Request A Change button if you want to change or update the information displayed. The NEW BANK DETAILS pane displays below the BANK ACCOUNT DETAILS FOR SELECTED ACCOUNTS OR NATIONAL REPORTING NUMBER information. See the example below.
Note: The Request for Change button will not always be displayed. If you have selected multiple Individual Accounts on the ADMINISTRATION > SWITCH SELECTED ACCOUNTS screen, a message will advise you to go back and select only one Individual Account.To add New Bank Details, you can type a new routing number into the Routing Number box.
You can also type a new account number into the Account Number box.
Note that a Delete column is added to the right side of the screen. If you wish to delete any of the accounts listed, simply click in the check box for the account or accounts.
Click the Submit button to submit any changes made on the screen.
Your submission will generate two emails: 1) To the account, to notify those customers of the change, and 2) To the McKesson email address, where the change will be made.
Note: The request for change will not be processed and take effect immediately. An email will be sent to the Accounts Receivable department, which must make the change before it becomes effective.You can click the Back button if you want to go back to the BANK ACCOUNT DETAILS FOR SELECTED ACCOUNTS OR NATIONAL REPORTING NUMBER screen.
|